

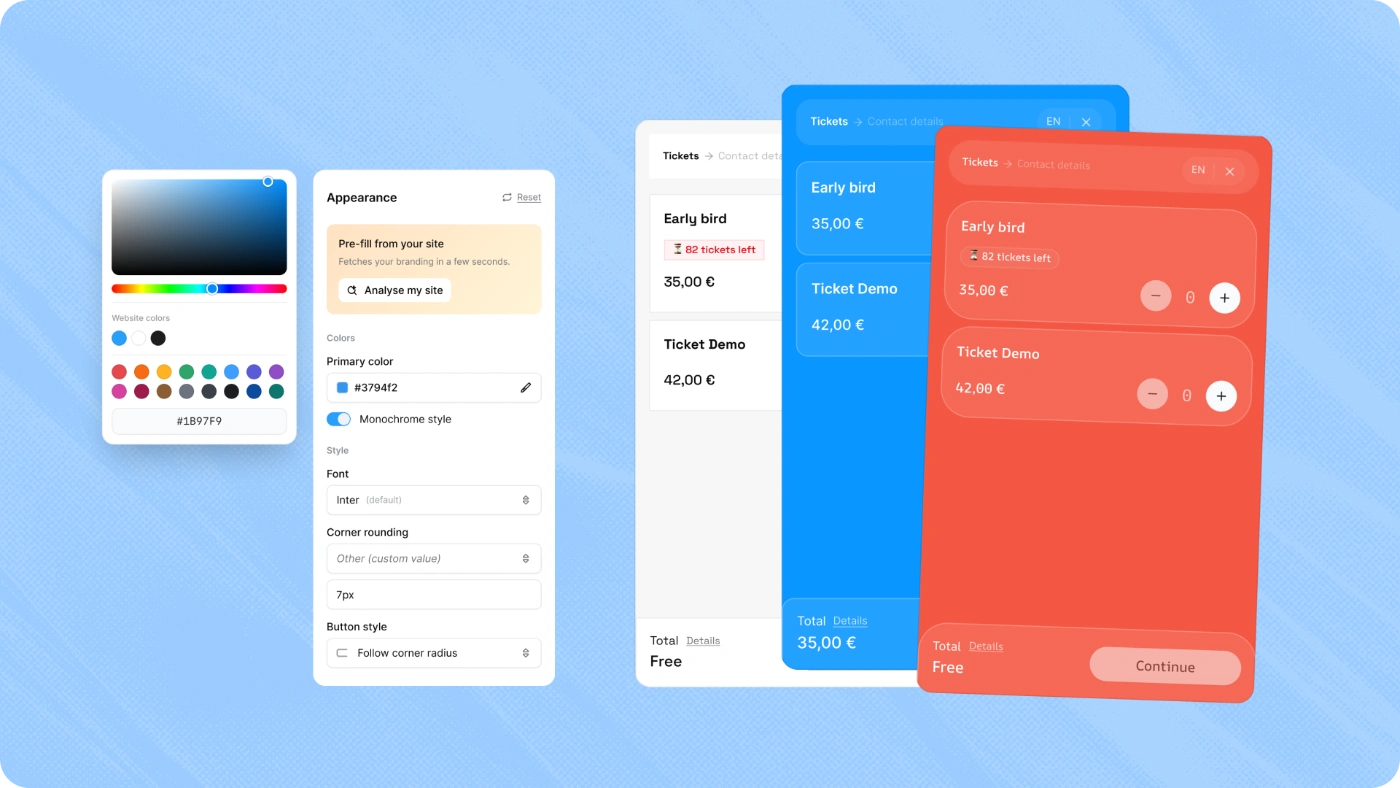
Integrate the PassPass ticketing module directly on your website or application. No more redirection to an external page: your visitors purchase on-site, in one click.
When clicking a button on your site, a modal opens with the complete checkout (ticket selection, form, payment). Generally, market alternatives opt for integrating the ticketing directly into the website body, which can cause issues like double scroll, mobile rendering, and user experience. PassPass opts for a dedicated modal within your website that opens on button click and perfectly adapts to all screens.
Customize the modal style to match your visual identity: colors, font, rounding, light or dark mode. The result gives the feeling of a native module on your site.
From your event dashboard, go to Advanced Settings → Website & Apps Integration in the left sidebar menu to configure the widget.
Customize Appearance
Adapt the widget to your site's style:
Primary Color : buttons and accents. Monochrome option to automatically derive the entire theme from this color
Light / Dark / Custom Mode : choose according to your site, or let automatic detection. The custom mode allows for more advanced configuration with the modal background color and the color of the inserts (ticket cards background, order summary, etc.)
Font : your site's font for a consistent rendering
Button Rounding and Shape : adjust the border-radius and choose between default, square, or rounded buttons
Analyze My Site
Use our analysis tool to pre-configure your modal style based on your website. Enter your site's URL, PassPass detects your colors, font, rounding, and light/dark mode. Check the result and apply with one click.
Add Your Authorized Domains
The widget only works on domains you authorize. This is a security measure to prevent the use of your widget on a third-party site.
Add each domain from the widget configuration. If you sell from multiple sites, list them all.
Without an authorized domain, the widget remains configured but the modal will be blocked by the browser on your site. Remember to add your domain before testing.
Preview
Test the rendering directly from your dashboard before going live. A live preview updates with each style modification. Mobile/desktop toggle available to check rendering on both formats.
Integrate on Your Site
Click on Integrate to access the 3 integration methods. Choose the one that fits your context.
Method 1: Ready-to-Paste Button (the simplest) PassPass generates a styled button with the complete code. Copy-paste it on your page where the button should appear. The button style defaults to your site's analysis and can be independently modified.
Method 2: Connect Existing Buttons Your site already has one or more purchase buttons. Insert the PassPass script in your site's header, then add an attribute to each button that should open the modal. Your design does not change.
Method 3: Programmatic Triggering For advanced integrations. Insert the PassPass script, then trigger the modal from your own code at the desired moment. Ideal for forms, custom events, or any specific scenario.
Pass Parameters via Your URL
You can pre-configure the modal by adding parameters to your page's URL. When the modal opens, these parameters are automatically taken into account.
Two parameters available:
pp_lang → forces the modal language (FR, NL, or EN). Useful if your page is in Dutch and you want the ticketing to display in Dutch as well.
pp_code → pre-fills a promo code. The visitor arrives with the promotion already applied or the hidden ticket already unlocked.
Add the parameters to the end of your URL with a ? before the first parameter, and a & between each additional parameter.
One parameter: yoursite.com?pp_lang=NL Two parameters: yoursite.com?pp_lang=NL&pp_code=PARTNER
The visitor arrives on your page, opens the modal, and has the ticketing directly configured according to your parameters. Ideal for targeted campaigns (newsletter, social media, partners).
Transmit Instructions to Your Webmaster
No need to draft a brief. Click on Copy for my webmaster to generate an instruction document ready to send via email or Slack. It contains the code for the 3 methods and the steps to follow.
You retain control over the authorized domains configuration from your dashboard. If the integration is done on a new domain, add it to your configuration for the widget to work.
Compatibility
The widget works on all types of sites: WordPress, Wix, Squarespace, Webflow, static sites, or custom applications. No framework required, the script weighs less than 10kb.
For any technical questions or need for support, feel free to contact our support.